Sonarr vs VideoSort: How They Work with NZBGet
If you’re setting up a Usenet automation workflow, you’ll likely come across Sonarr and VideoSort. These two tools serve different purposes, but they can also complement each other depending on how you handle downloads. This guide breaks down their differences, shows how they integrate with NZBGet, and helps you decide which one (or both) belongs in your setup.
What Is Sonarr?
Sonarr is a tool designed to automate the entire download process. It:
- Monitors RSS feeds from NZB indexers
- Finds and downloads new files
- Renames them
- Sorts them into designated folders
- Can trigger downloads via NZBGet
Example: Sonarr can automatically detect new items from your watchlist, download them, apply your preferred naming format, and organize the files into the correct destination folders without manual intervention.
What Is VideoSort?
VideoSort is a post-processing script that runs within NZBGet. It doesn’t search or download articles, but instead helps you:
- Rename downloaded files
- Move them to organized folders based on naming patterns
- Clean up file names and locations after downloads finish
Example: After a manual NZB download, VideoSort can rename a file with a generic or messy name to something cleaner and more easily identifiable, then move it into your preferred folder structure for easier access and organization.
Key Differences: Sonarr vs VideoSort
| Feature | Sonarr | VideoSort |
|---|---|---|
| Primary Role | Structured file automation | Post-download renaming & sorting script |
| Target Files | Multi-part or categorized downloads | Any downloaded files with naming variations |
| Triggers | Searches NZBs, initiates downloads | Processes completed downloads in NZBGet |
| Integration | Works with indexers, NZBGet, SABnzbd, Radarr | Built into NZBGet’s Extension Manager |
| Automation | Full end-to-end automation | Only runs after download completes |
| Setup Effort | Higher (requires configuration of indexers and filters) | Lower (simple path and naming rules) |
Can You Use Sonarr and VideoSort Together?
Yes—and in some cases, it’s ideal. Here’s how they can coexist:
Use Case 1: Fully Automated Workflow (Sonarr Only)
- Let Sonarr monitor your indexers
- Sonarr sends NZBs to NZBGet
- Sonarr watches your download folder and moves/renames completed files
- VideoSort is disabled
Use Case 2: Manual NZBs + Post-Processing (VideoSort Only)
- You manually add NZBs to NZBGet
- VideoSort automatically organizes them once the download finishes
- Sonarr is not used
Use Case 3: Hybrid Setup (Both Tools)
- Use Sonarr for scheduled and monitored downloads
- Use NZBGet + VideoSort for manually added .iso files or one-off downloads
- Set up paths so both systems organize files into places Sonarr can still scan (like matching destination directories)
Visual Workflow: Who Should Handle the Downloads?
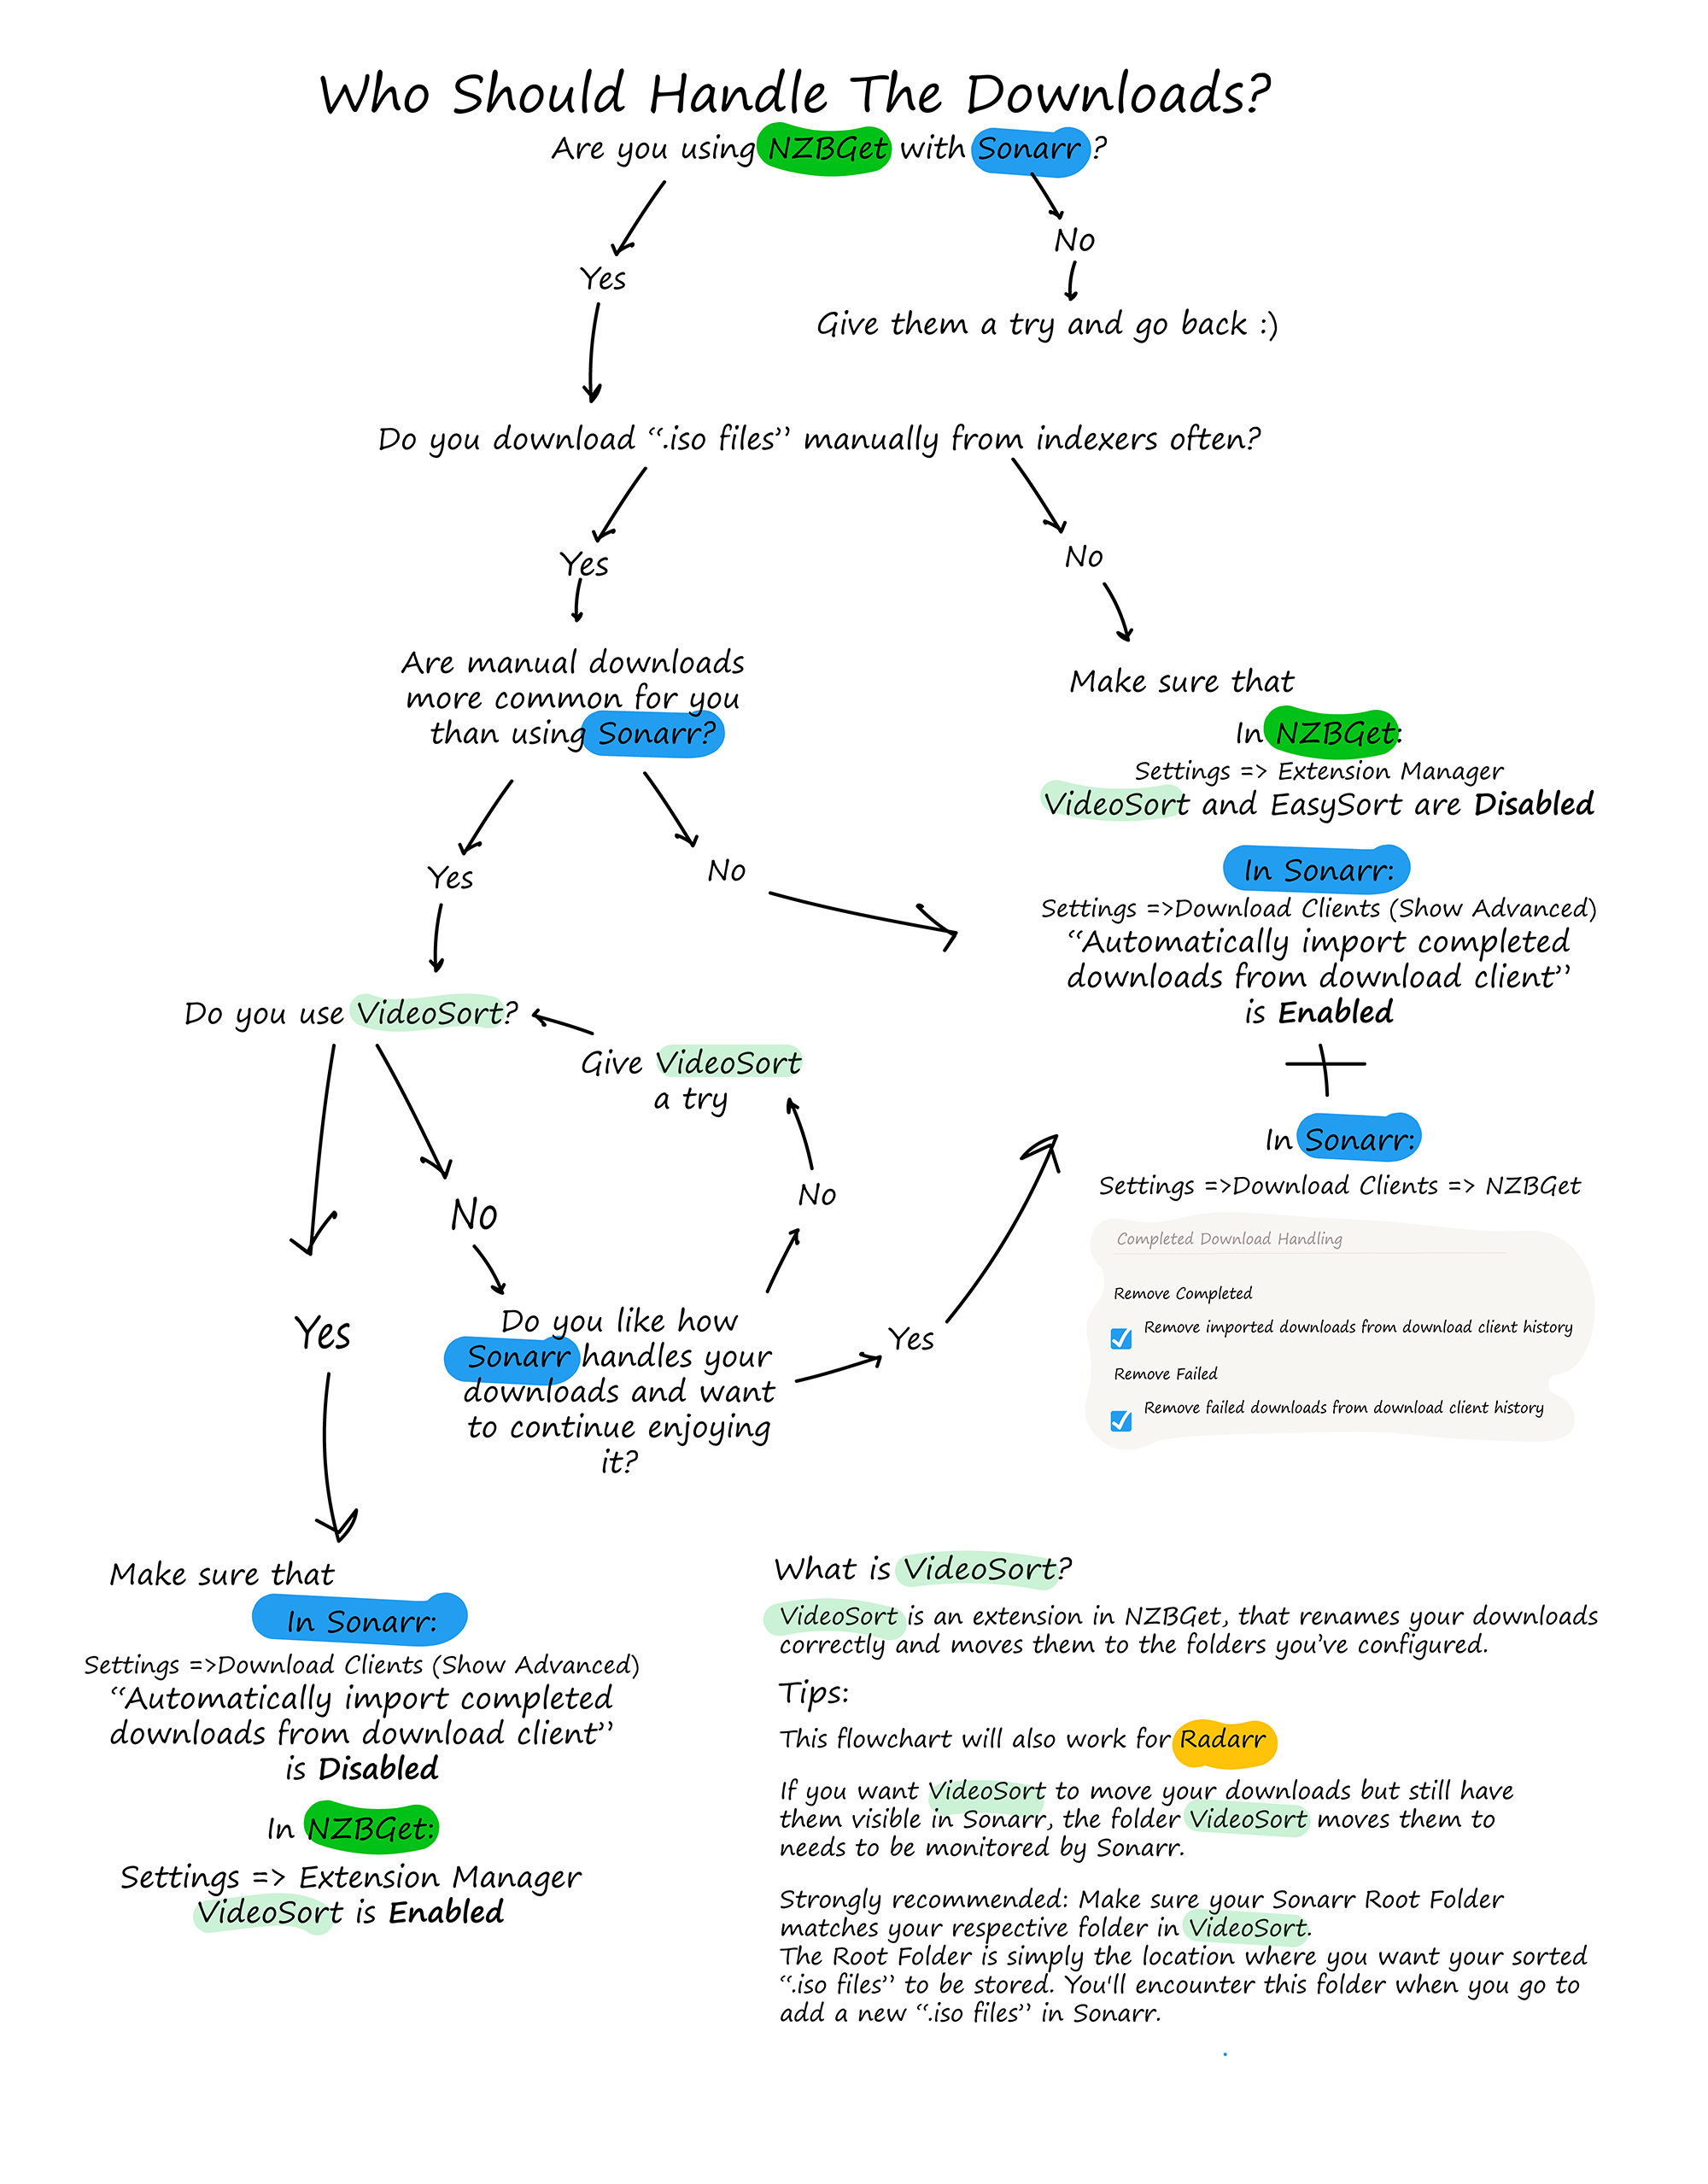
This flowchart helps you decide who should take over the download handling based on how you use NZBGet and Sonarr. Some key configuration notes:
- If Sonarr handles everything:
- In Sonarr → Settings → Download Clients (Show Advanced):
- ✅ Enable: “Automatically import completed downloads from download client”
- In NZBGet → Extension Manager:
- ❌ Disable: VideoSort and EasySort
- In Sonarr → Settings → Download Clients (Show Advanced):
- If VideoSort is handling downloads:
- In Sonarr → Download Clients:
- ✅ NZBGet as the client
- ❌ Disable: automatic import
- In NZBGet:
- ✅ Enable: VideoSort
- In Sonarr → Download Clients:
Tip: To keep VideoSort’s output compatible with Sonarr scanning, make sure the folder VideoSort moves sorted files into matches your Sonarr root folder structure.
Which One Should You Use?
Choose based on your workflow:
- Use Sonarr if you want full automation for structured or ongoing files.
- Use VideoSort if you mostly download manually and want your downloads organized.
- Use both if you want automation for recurring posts and control over one-off or bulk downloads
Related Tools and Resources
Introduction
Installation manuals
- Installation on Windows
- Installation on Windows via WinGet
- Installation on macOS
- Installation on macOS via Homebrew
- Installation on Linux
- Installation on Docker
- Installation on Docker - LinuxServer.io version
- Installation on Android
- Installation on Synology
- Installation on QNAP
- Installation on other NAS devices
Building manuals
Configuration
- Backup And Restore Settings
- Performance Tips
- Choosing Cipher
- Behind Other Web Server
- TLS certificate verification
- What is the Default NZBGet Password?
- NZBGet Docker Setup Guide
- NZBGet Port Settings and Access Guide
- How to Configure NZBGet: Complete Setup Guide
- What Is Usenet?
- NZBGet 502 Error: Quick Fix Guide
- How to Upgrade from NZBGet v21.1 to the Latest NZBGet Version
- Slow NZBGet Speeds? Here’s How to Fix It
- NZBGet Performance Optimization Guide
- NZBGet Path and Folder Structure Guide
- How to Link NZBGet with Sonarr, Radarr, and Other Tools
- Sonarr vs VideoSort: How They Work with NZBGet
- NZBGet Storage Guide: Improve Performance with Smarter Path Setup
- How to Configure NZBGet on Android TV
- Using NZBGet with Sonarr and Radarr on Android TV
Usage
- Quick Filter
- Keyboard Shortcuts
- RSS and duplicate check
- VideoSort
- Console Mode
- Command Line Reference
- Performing Speed Tests
- NZBGet Interface Buttons Explained: What They Do and How to Use Them
- How to Use the NZBGet Status Tab
Development
Extensions
- Extension Scripts
- Post-processing scripts
- Scan Scripts
- Queue Scripts
- Scheduler Scripts
- Feed Scripts
- NZBGet Extension Manager: What It Is and How to Use It
- API reference
News server setup
- Astraweb
- BlockNews
- Cheapnews
- EasyNews
- Eweka
- FreeDiscussions
- Frugal Usenet
- GigaNews
- NewsDemon
- Newsgroup Ninja
- NewsgroupDirect
- Newshosting
- Pure Usenet
- SunnyUsenet
- Supernews
- theCubeNet
- ThunderNews
- TweakNews
- Usenet.Farm
- UsenetExpress
- UsenetServer
- UseNext
- ViperNews
- XLned
- XS News