How to Set Up NZBGet: Quickstart Guide for Beginners
Looking to get started with NZBGet? This quickstart guide walks you through exactly how to set up NZBGet and connect it to your Usenet provider and indexer. It’s designed to get you downloading fast in just a few steps.
What You Need Before You Begin
To use NZBGet with Usenet, you’ll need three things:
1. A Usenet Provider
This gives you access to Usenet newsgroups. When you sign up, you’ll receive:
- News server hostname
- SSL port number
- Username and password
You’ll need this info when configuring NZBGet.
2. An NZB Indexer
This is a search engine for Usenet. Indexers allow you to find and download NZB files, which NZBGet uses to download articles. Some popular indexers offer RSS feeds for automation.
3. NZBGet
NZBGet is the software that downloads and reassembles articles from your Usenet provider using NZB files.
Step-by-Step: How to Set Up NZBGet
Step 1: Download and Install NZBGet
- Visit the NZBGet download page and download the installer for your operating system.
- Install the application.
- Once installed, launch the NZBGet Web Interface by visiting: http://localhost:6789
Step 2: Configure Your Download Folder
- Go to Settings > PATHS
- Set DestDir to the folder where you want NZBGet to save completed downloads.
- Make sure this location has plenty of free disk space.
Step 3: Add Your Usenet Provider
- Navigate to Settings > NEWS-SERVERS
- Find Server1 and update the following fields using the credentials from your provider:
- Host = news server hostname (e.g., news.example.com)
- Port = 563 (for SSL) or as instructed by your provider
- Username = your Usenet username
- Password = your Usenet password
- Enable SSL if available
- Click Test Connection to make sure it works
- Click Save all changes
At this point, your NZBGet installation is ready to download.
How to Use NZBGet to Download
Option 1: Manually Add NZB Files
- Go to your NZB indexer and download a .nzb file to your computer.
- In the NZBGet web interface:
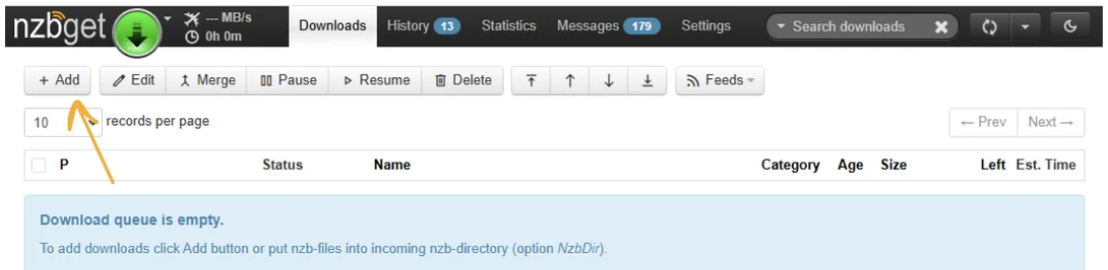
- Click Downloads
- Click + Add
- Choose Select Files and pick one or more .nzb files from your computer
- The selected NZBs will appear in the list below the button
- Click Submit to add them to the queue
- NZBGet will begin downloading immediately.
- When complete, check your DestDir folder for the files.
Option 2: Use RSS Feeds for Automation
Many indexers let you create RSS feeds based on your search or cart.
To use an RSS feed in NZBGet:
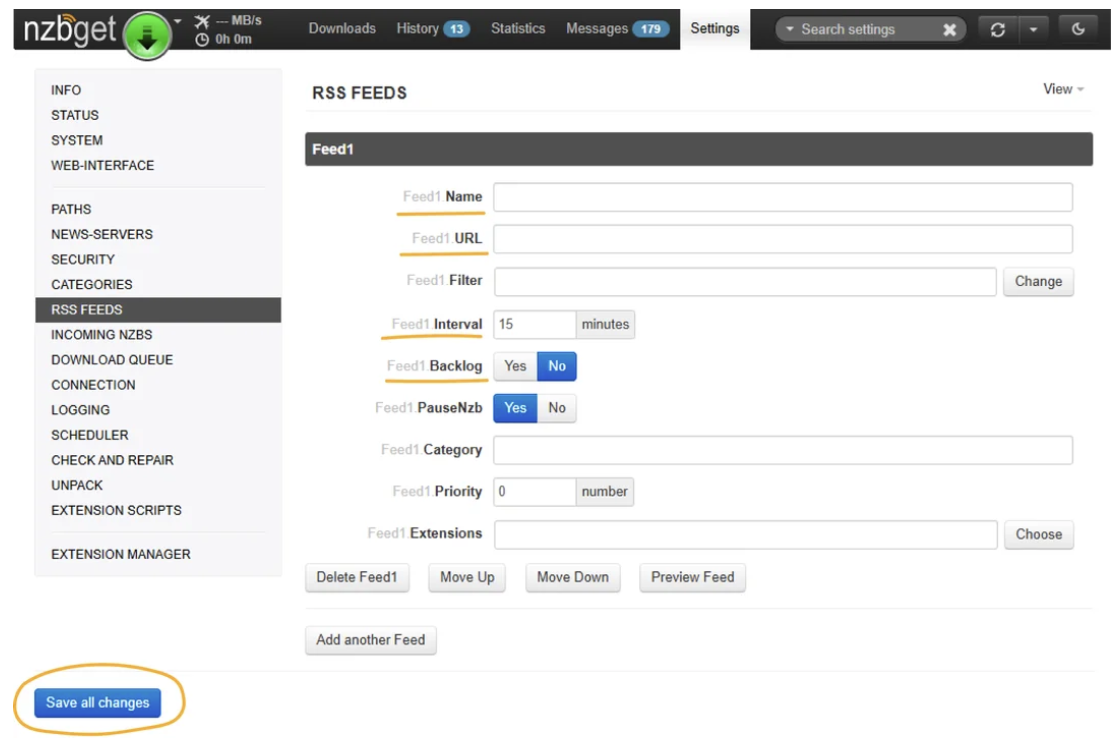
- Go to Settings > RSS FEEDS
- Click Add Feed
- Give your feed a name
- Paste the RSS feed URL into Feed1.URL
- Set the interval – A fetch interval of 15 to 30 minutes works well for most indexers. Avoid setting it too low, as this can lead to performance issues or trigger rate limits. For example, some indexers recommend not setting the interval below 5 minutes.
- Set Backlog to No (unless you’re importing older items)
- Click Save all changes
NZBGet will check the feed automatically and download new NZBs.
Common Questions (People Also Ask)
What is NZBGet used for?
NZBGet is a downloader for Usenet. It processes NZB files and retrieves articles from Usenet newsgroups, reassembling them into usable files.
Is NZBGet free?
Yes. NZBGet is completely free and open source.
Do I need a VPN with NZBGet?
Not necessarily. NZBGet supports SSL encryption, which protects your traffic from being monitored. A VPN can add another layer of privacy, especially if your provider logs access.
Can NZBGet work with Sonarr and Radarr?
Yes. NZBGet integrates well with automation tools like Sonarr and Radarr, which can send NZB files to it automatically.
Next Steps
- Set up an indexer if you haven’t already
- Explore automation with Sonarr or Radarr
- Join the r/nzbget community for tips and help
- Visit the official documentation for advanced configuration
Introduction
Installation manuals
- Installation on Windows
- Installation on Windows via WinGet
- Installation on macOS
- Installation on macOS via Homebrew
- Installation on Linux
- Installation on Docker
- Installation on Docker - LinuxServer.io version
- Installation on Android
- Installation on Synology
- Installation on QNAP
- Installation on other NAS devices
Building manuals
Configuration
- Backup And Restore Settings
- Performance Tips
- Choosing Cipher
- Behind Other Web Server
- TLS certificate verification
- What is the Default NZBGet Password?
- NZBGet Docker Setup Guide
- NZBGet Port Settings and Access Guide
- How to Configure NZBGet: Complete Setup Guide
- What Is Usenet?
- NZBGet 502 Error: Quick Fix Guide
- How to Upgrade from NZBGet v21.1 to the Latest NZBGet Version
- Slow NZBGet Speeds? Here’s How to Fix It
- NZBGet Performance Optimization Guide
- NZBGet Path and Folder Structure Guide
- How to Link NZBGet with Sonarr, Radarr, and Other Tools
- Sonarr vs VideoSort: How They Work with NZBGet
- NZBGet Storage Guide: Improve Performance with Smarter Path Setup
- How to Configure NZBGet on Android TV
- Using NZBGet with Sonarr and Radarr on Android TV
Usage
- Quick Filter
- Keyboard Shortcuts
- RSS and duplicate check
- VideoSort
- Console Mode
- Command Line Reference
- Performing Speed Tests
- NZBGet Interface Buttons Explained: What They Do and How to Use Them
- How to Use the NZBGet Status Tab
Development
Extensions
- Extension Scripts
- Post-processing scripts
- Scan Scripts
- Queue Scripts
- Scheduler Scripts
- Feed Scripts
- NZBGet Extension Manager: What It Is and How to Use It
- API reference
News server setup
- Astraweb
- BlockNews
- Cheapnews
- EasyNews
- Eweka
- FreeDiscussions
- Frugal Usenet
- GigaNews
- NewsDemon
- Newsgroup Ninja
- NewsgroupDirect
- Newshosting
- Pure Usenet
- SunnyUsenet
- Supernews
- theCubeNet
- ThunderNews
- TweakNews
- Usenet.Farm
- UsenetExpress
- UsenetServer
- UseNext
- ViperNews
- XLned
- XS News